Getting Started with the CF.Cumulus Community Edition
- Matt Collins
- Jun 20, 2025
- 4 min read
Do It Yourself Lakehouse Deployment
For those who have been following along with our product CF.Cumulus, we have been gearing up for some exciting developments and want to give more power and independence to users. As such, we’re putting together some comprehensive “How-to” guides to simplify the deployment process for Community Edition users.
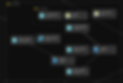
This deployment guide walks you through setting up CF.Cumulus with the Azure Resources depicted below.
You’ll have a fully decoupled architecture using our recommended combination of resources.

The deployment demonstrated in this guide includes the following:
Resource Deployment
You’ll find a ready-to-go set of Azure Resources deployed in a Resource Group to your Specified Azure Subscription.
Role Assignments
Relationships and communications between the resources is all configured as part of this.
Azure Functions populated
The middleware is taken care of and pushed up to the app.
Deploy Data Factory objects
We’ve spent a lot of time developing standardised and parameterised Pipelines, ready for you to use with no further configuration.
Spark Compute Clusters
Some small compute targets to work with in Databricks for populating your Delta Lake Tables.
Spark Notebooks
The pre-configured notebooks to handle this configuration.
Core Metadata Configurations
The schemas, tables and stored procedures waiting for you to add personalised metadata.
Coming Soon!: Sample Metadata
Ease into using CF.Cumulus in an example driven setting.
Other ways to deploy
Before digging into the requirements, did you know there are other ways to deploy CF.Cumulus? We are now on the Azure MarketPlace and you can leverage the user friendly UI for a more hands-off approach, while signing up for a supported version of the product.

If you'd like to know more, please follow the link here.
Requirements
Visual Studio Code with Bicep extension.
PowerShell (Module install/imports handled as part of scripts).
Azure Entra Account.
Deployment Privileges in Azure.
Subscription Level Contributor Role Assignment.
What's Included
We use a PowerShell module to orchestrate the workflow of deploying CF.Cumulus. This script, deploy_wrapper.ps1 performs the following operations:
Login to Azure
Deploy infrastructure with BiCep file
Package and publish Azure functions to the App with PowerShell
Package and publish Data Factory artifacts to the workspace with PowerShell
Create Databricks components with PowerShell
Personal Access token for your user to authenticate against Databricks.
Create a Secret Scope so that Databricks may read secrets from your Key Vault.
Create a Spark cluster for running your distributed computing workloads.
Publish notebooks to the workspace, ready to run the pre-build logic.
Publish DacPacs for all core metadata to the Azure SQL Metadata Database
This includes generating Schemas, Tables, Stored Procedures required.
Post-Deployment Scripts also instantly populate core tables with environment-related metadata.
Explicit permissions in the database for the Environment's Data Factory.
User Configuration
As a user, you're only requirement is to get some details regarding your Azure Tenant and Subscription and specify your resource naming convention. This is achieved through setting the parameters in the infrastructure/configuration/_installation/main.bicepparam you'll see in the next section.
Note: Azure has a a Global naming lock on a few of its resource types, such as Storage Accounts, so you may get a deployment error if you attempt to name a resource which already exists in the cloud.
A bit about BiCep...
Configure Infrastructure As Code assets
Deploy Azure Resources from code specifications
Source Control your resource deployments and Lakehouse infrastructure design
Override for different environments with parameter files
Ability to visualise deployments
If using the BiCep extension in VSCode, you'll have access to the Visualiser where you can see an diagrammatic view of everything you've specified, including dependencies and relationships between resources.

The Process

Navigate to our CF.Cumulus GitHub repository.
Clone the repo to your local computer and open in Visual Studio Code.
Open the infrastructure/configuration/_installation/main.bicepparam file and provide your values for the following parameters:
param orgName = 'cf' // Abbreviation of your Organisation's name
param domainName = 'cumulus' // Domain for installation of Cumulus
param envName = 'dev' // Environment name
param location = 'uksouth' // Azure region you are deploying to
param uniqueIdentifier = '01' // Identifier to ensure unique naming
Specify any additional configuration in the same file. For a "getting started" environment, the additional change we'd recommend is to add your IP for SQL Server connectivity:
// SQL Server: Optional Parameters
param myIPAddress = '1.1.1.1' // For SQL Server Firewall rule
Save the file!
Open the infrastructure/deployment/deploy_wrapper.ps1 file to view the PowerShell executor module. Review the parameters listed here and get these from your Azure tenant.
For ease of use, and confidence you've recorded the right values, input them in to the following PowerShell command:
. 'C:\Users\Matt\Repos\CF.Cumulus\infrastructure\deployment\deploy_wrapper.ps1' -tenantId 'My Tenant GUID' -subscriptionId 'My Subscription Name' -location 'uksouth'Note: The deploy_wrapper.ps1 PowerShell script allows you to input these parameters at execution time, but I personally find it easier to specify them as part of a declarative statement. Just be sure to get the correct path of the file you are running, rather than using my example path!
Copy and Paste your command into a PowerShell terminal (such as the integrated terminal in VSCode) and execute.
Follow the process on screen and in 15-30 minutes you will have a deployment of Cumulus ready to explore.
Exploring
With the deployment complete, we can browse the resources we've deployed. Navigating to our resource group, we see the list of all the modules specified and enabled in our BiCep files. We can further explore the individual deployments, shown in the red box.

The Deployments page gives us detail on the specific deployments we ran as part of the script. This corresponds specifically to the modules in our main.bicep file. Should they occur, details on failure can be investigated in greater detail here.

Digging a little deeper, we can open the Function App and see all of the Pipelines exist, with green ticks showing they are available and healthy.

Linked Services with dynamic configurations are populated in Data Factory, with the exception of a few common ones, which have hard-coded values set to our specific resource names we've deployed:

We can explore the Databricks Notebooks and Compute in a similar way, along with connecting to the SQL Instance to preview some of the metadata we've populated during the SQL DacPac deployments.

Summary
This guide aims to get you started with using the Community Edition of CF.Cumulus.
If you are looking for support and guidance with the product, here are some useful links to get you started:
